Frequently Asked Questions
Is your device FAA certified?
The DIY-D ESP32 kit has been approved by he FAA!
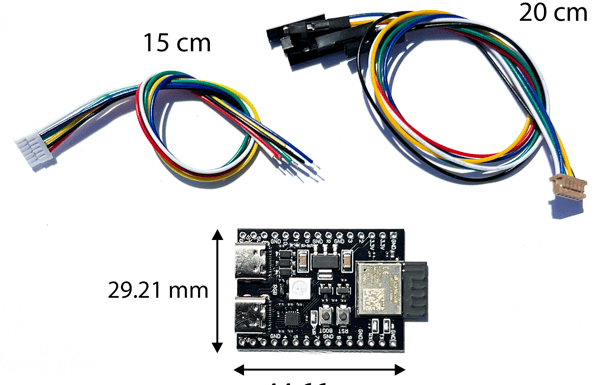
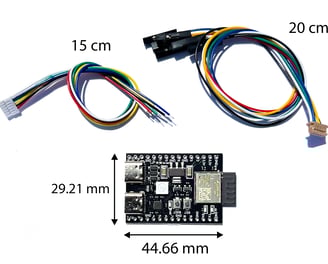
How do I assemble my DIY-D?
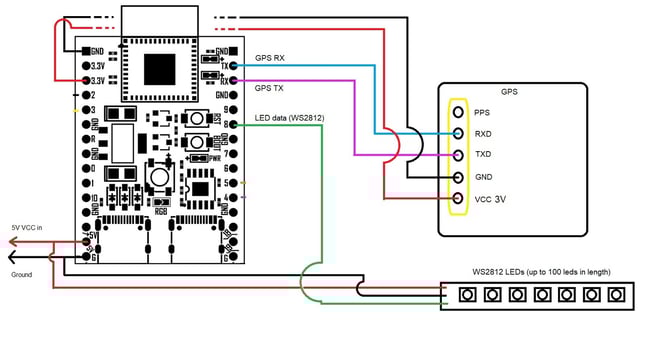
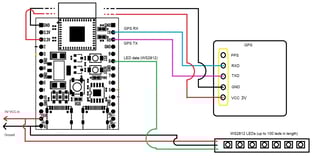
We suggest looking into the full manual for instructions! The Module should work with most commercially available GPS units if wired similarly to the diagrams, or with most ArduPilot enabled autopilots. If self-sourced, some gps units may require different voltage power connections. If you are having trouble integrating your GPS unit let us know by contacting us so we may offer assistance.
Every DIY-D module produced after December 11th, 2023 is capable of either mode of operation! If you would like to upgrade your firmware, please contact us for a guide.

How do I connect my Remote ID module to my drone?
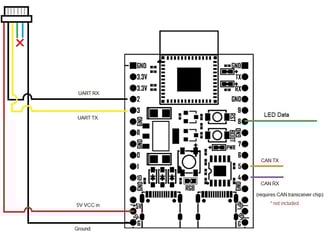
You can download the DIY-D unit manual here for all your assembly needs! This includes setting up your fully standalone GPS included kit or integrating your DIY-D into an existing ArduPilot based UAS.
How do I connect to my Remote ID module?
The easiest way to connect and read data from your DIY-D Module is through a mobile app called OpenDroneID available via the Play Store for Android. We have yet to find a good equivalent for iPhone, but any mobile user can check the status of their unit via the following method:
When powered on your RID device will create a wifi access point with a name similar to "RID_XXXXXXXXXX" where the X sequence will correspond to the MAC address of your module's broadcast chip. The wifi passcode should be "ArduRemoteID" as default. Connect to that wifi network, confirming to stay on the network even though it doesn't have internet access if on mobile, and proceed to the address http://192.168.4.1 to reach your module's status and admin panel. From this web page you can update your module's firmware remotely or check the status of the module's connection to your autopilot.
Can I attach external LEDs to my remote ID unit?
With a DIY-D Remote ID module, you can attach a string of up to 100 WS2812 LEDs to extend the module's status LEDs outside your fuselage to make it easier to see your Remote ID Module's status.
ArduPilot Installation Guide
The installation for this RID chip can be broken down into a few steps:
The physical installation and wiring connection
Compiling the OpenDroneID firmware and flashing your autopilot
Configuring the new firmware in Mission Planner or QGroundControl
Ideally no one should have to perform this step, but as it stands we currently need to compile our own ArduPilot firmware to enable OpenDroneID features. Should you have an expensive, professionally manufactured UAS, STOP HERE and contact your manufacturer for an OpenDroneID enabled firmware upgrade.
There are a few items you will need to secure for an optimal compiling experience, the first being an up-to-date copy of the ArduPilot firmware which can be downloaded or cloned from the ArduPilot Github here by clicking on the green "code" button.
Compiling this firmware is most easily done with a Linux environment handy. If you're like many, and have a windows device, you can still easily perform these steps by acquiring the Ubuntu subsystem app for Windows.
After downloading and unpacking, or cloning your firmware you will need to navigate to your unpacked directory to perform some text editing operations.
You will first need to navigate to this directory: ...\ardupilot\libraries\AP_HAL_ChibiOS\hwdef\
From here you will enter the directory of your autopilot hardware.
After entering your autopilot's directory you will need to open the "hwdef.dat" file with a text editor and add the following line at the bottom of the file:
define AP_OPENDRONEID_ENABLED 1
You may also want to do the same to the "hwdef-bl.dat" if you intend on replacing the bootloader of your autopilot. It has not proven necessary to replace the bootloader unless you wish to secure your autopilot so it may only accept firmware with a specific ID code. Details on that can be found from ArduPilot's video here.
Next we will return to the main /ardupilot/ directory with our linux terminal and input the following to configure our compile:
cd /mnt/<your drive letter [c,d,e,...]>/<path to ardupilot folder>/ardupilot
Ex.: cd /mnt/c/remoteID/ardupilot
git submodule update --init --recursive
./waf configure --board <your board name>
If your terminal reports "Missing waf submodule" you may need to run the command twice after it has acquired the module.
Remembering that <your board name> should be replaced with the name you found in the "/hwdef/" folder.
Next should be the actual compilation command:
"./waf plane" for plane firmware
or:
"./waf copter" for copter firmware.
Once that proceeds, assuming our compile is successful we should have a new firmware binary available in a directory similar to:
/ardupilot/build/<your board name>/bin/
With a nice new "arduplane.bin" or "arducopter.bin" you can then proceed with flashing your autopilot and configuring your Remote ID chip!
Whether you use Mission Planner or QgroundControl to flash your firmware, you should be able to use their "Load custom firmware" options to select your new ".bin" file. In QgroundControl this does require checking the "Advanced settings" box in Firmware Setup.
Compiling your firmware
When it comes to configuring your new firmware and chip, you'll need to have access to either Mission Planner or QGroundControl to edit some parameters to enable OpenDroneID.
In the parameter editor of either software or app you should set the following settings:
DID_ENABLE: 1
DID_OPTIONS: 1 - any other option may prevent the aircraft from arming
DID_MAVPORT: X where x is the serial or UART port attached to the DIY-D module
DID_CANDRIVER: 0 if using normal UART, 1 if using a CAN transceiver chip
Configuring your firmware after flashing
ArduRemoteID
The main source firmware for our DIY-D units can be found available on ArduPilot's Github under a GPL-2.0 license. We at DIY-D do not claim ownership of the firmware and thank the ArduPilot team for making high quality firmware available to the DIY community!